EZ Sander Troubleshooting
INSTALL & START-UP TRAINING VIDEO

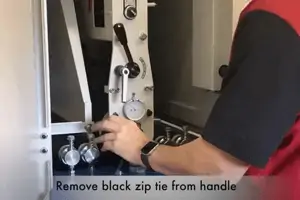
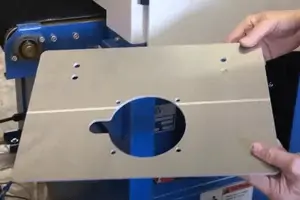
Preparing for First-Time Use
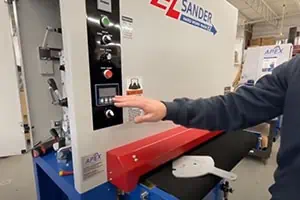
Understanding the Control Panel
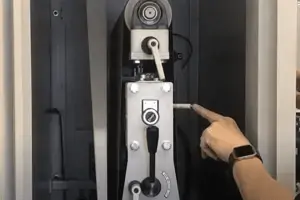
Tracking the Abrasive Belt
Performing a Scratch Test
Replacing Minkol Batteries & Resetting Height Origin
TROUBLESHOOTING GUIDE
| Trouble | Probable Cause | Remedy |
|---|---|---|
| Sander will not start | No incoming power | Check that the sander is connected to power, fuses are not blown or circuit breakers are not tripped |
| Low voltage | Check the voltage at the power source | |
| Loose wiring | Inspect and remedy any loose connections on sander | |
| Start switch is defective | Replace the start switch. Contact Apex representative for parts and service. | |
| Motor is defective | Replace the motor. Contact Apex representative for parts and service. | |
| The conveyor belt will not run | Didn't wait 5-10 seconds to power up machine | Wait 5-10 seconds after a stop or reset before starting the machine to allow VFD enough time to power up |
| The sanding belt clogs too quickly | Grit of the sanding belt is too fine | Choose a larger grit of sanding paper |
| Too much material is being sanded off | Reduce the amount of material being removed | |
| Sanding belt will not run, or slips on the roller | Emergency stop button is engaged | Disengage the stop button |
| Limit switches are activated | Position the sanding belt so it is between the limit switches | |
| Insufficient air pressure causing the belt to slip on rollers | Make sure air pressure regulator is set at 75 to 80 PSI (Refer to page 9 in the EZ Sander Manual) | |
| Dust or debris on the conveyor rollers | Clean the conveyor rollers | |
| Sanding belt keeps tripping limit switch | Tracking adjustment/oscillation is not correct | Set tracking correctly Watch video on tracking the abrasive belt |
| Dust covering the photo eye | Check and clean dust from the photo eye | |
| Machine takes too long to stop after the emergency switch is activated | Air pressure is too low | Set air pressure to 75 to 80 PSI |
| Brake pads are worn | Replace brake pads. Contact Apex representative for parts and service. | |
| Grinding noise when brake is activated | Brake pads are worn | Replace brake pads (rotor may need turning also). Contact Apex representative for parts and service. |
| Too much rounding | Too much material is being removed, too tightly | Reduce the amount of material making the contact drum press being removed |
| The front end of the stock is thinner than the rear | Rear hold down roller is too low in relation to the contact drum | Raise the rear pressure bar (Refer to pages 16-17 in the EZ Sander Manual) |
| The rear end of stock is thinner than the front | Front hold down roller is too low in relation to the contact drum | Raise front pressure bar (Refer to page 16 in the EZ Sander Manual) |
| Uneven thickness between the left and right sides of the workpiece | Table is not positioned correctly in relation to the contact drum | Adjust table until it is parallel left to right (Refer to pages 17-18 in the EZ Sander Manual) |
| Front hold down roller is not in the correct position in relation to the contact drum | Adjust the front hold down roller so that it is parallel (Refer to page 16 in the EZ Sander Manual) | |
| Conveyor belt is worn | Replace the conveyor belt. Contact Apex representative for parts and service. | |
| Uneven thickness between the front and rear ends of the workpiece | Feed rate is too high | Reduce the feed rate (Refer to page 16 in the EZ Sander Manual) |
| Too much stock removal | Reduce the amount of material being removed | |
| Grit of sanding belt is too fine | Use a larger grit sanding belt | |
| Unequal position of the hold down rollers | Adjust the hold down roller to produce pressure on the stock | |
| Table is not parallel front to back | Adjust the table until it is parallel front to back (Refer to pages 17-18 in the EZ Sander Manual) | |
| Workpiece slips on on conveyor belt | There is not enough pressure between the hold down roller and the workpiece | Increase pressure between the hold down roller and the workpiece |
| There is too much dust or debris on the conveyor belt | Clean the conveyor belt with compressed air | |
| Rear pressure bar is too low, halts the work piece | Raise the rear hold down roller until the proper contact is achieved | |
| Straight strip of notches or grooves in the workpiece | Hold down roller is dirty | Clean the hold down rollers |
| Contact drum is scratched | Replace the contact drum. Contact Apex representative for parts and service. | |
| “Snake” marks on workpiece | Local damage to the sanding belt | Replace the sanding belt Watch video on replacing sanding belt |
| Straight parallel running stripes over the entire width of the workpiece | Joint of the sanding belt is too thick or is open | Repair joint or replace the sanding belt |